SAML with ADFS
This guide supplements the Configuring your IdP server portion of the Configuring SAML 2.0 docs using ADFS as your identity provider (IdP). Please ensure you've already read and understand the concepts in the Configuring SAML 2.0 documentation before continuing.
This guide assumes you have already configured your ADFS account and have access to it.
Microsoft Active Directory Federation Services (ADFS) has had support for SAML 2 integrations since ADFS v2.0. Integrating ADFS with IE's applications requires configuration in ADFS and also in the specific IE application that is being used. If more than one IE's application is being used, then the integration needs to be completed for each application.
Configure the SAML IdP
In this scenario, ADFS will be acting as the SAML identity provider (IdP). To configure an ADFS Relying Party Trust (ADFS's term for a service provider), you'll need the SP (service provider) metadata from IE.
Create the Relying Party Trust
To complete the IdP configuration, in ADFS we need to make ADFS aware of the relying party:
- Navigate to the Relying Party Trust node.
- Click
Add Relying Party Trust...in theActionspane. - If you are prompted about the application is "Claims aware" or not, choose
Claims aware. - In the Select Data Source step, select the
Import data about the relying party from a fieldradio button, Browse... to the metadata file provided by IE, and clickNext. - On the next step, enter a desired name into
Display Name. This is a free form field, but it is recommended to enter the Innovative Educator's application name. - If prompted about an access control policy, choose
Permit everyone, unless you have a reason to choose something else. - Finish up the wizard.
ADFS now knows about IE's application.
Releasing user attributes
Please refer to the SAML 2.0 documentation for requirements and recommendations regarding attributes and claims.
We need to instruct ADFS to send some information about the user to the SP.
- Select the newly create relying party trust, and select
Edit Claims Issuance Policy...from theActionpane. - From the
Edit Claim Issuance... dialog, clickAdd Rule... - Add
AD Attributesattribute definition:- From the
Add Transform Claim Rule Wizard, selectSend LDAP Attributes as Claims, and clickNext. - In the
Claim rule namefield, type "AD Attributes". - In the Mapping of LDAP attributes to outgoing claim types, add the following entries:
- Given-Name -> firstName
- Surname -> lastName
- E-Mail-Addresses -> email
- Optional data to be associated with the user -> ref1
- Optional data to be associated with the user -> ref2
- Optional data to be associated with the user -> ref3
- Click
Finishto create the rule.
- From the
- Add the
studentLicenseIdsattribute definition:- From the
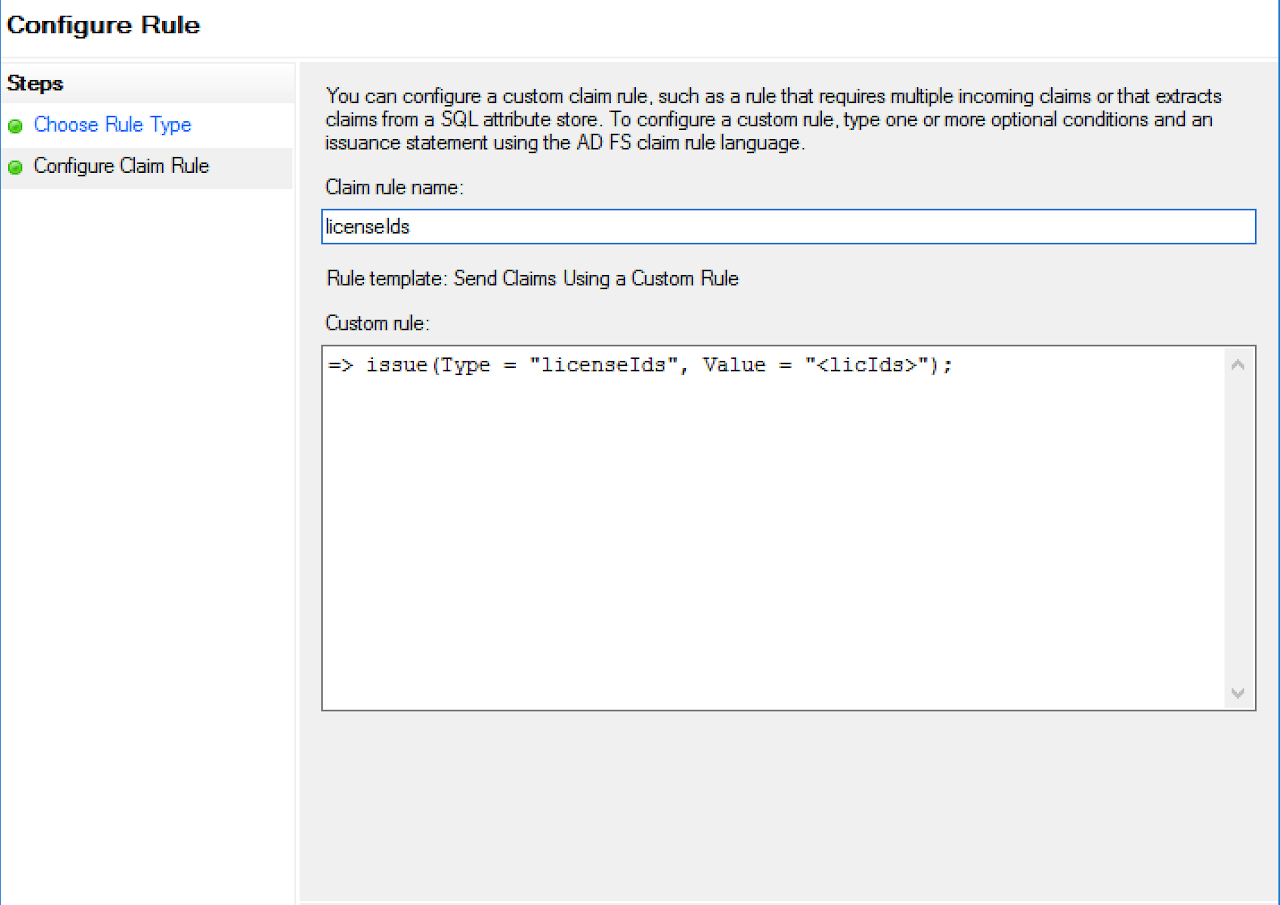
Add Transform Claim Rule Wizard, selectSend Claims Using a Custom Rule, and clickNext. - In the
Claim rule namefield, type "studentLicenseIds". - In the
Claim rulefield enter the following string:=> issue(Type = "studentLicenseIds", Value = "<licIds>");` - Replace the string, "<licIds>" with the value provided by Innovative Educators.
- Click
Finishto create the rule.
- From the
Dialog Box Examples
A populated Add Transform Claim Rule Wizard dialog for AD user attributes.

A populated Add Transform Claim Rule Wizard dialog for studentLicenseIds.
Configure the NameId
The Name Identifier is the unique ID that will identify SAML users coming from the IdP (identity provider).
Using sAMAccountName for NameID (optional)
The following example has you erroneously strip the domain from the NameID and needs updating. Leaving here for reference until the example can be updated.
-
Add "Get Stripped sAMAccountName" attribute definition:
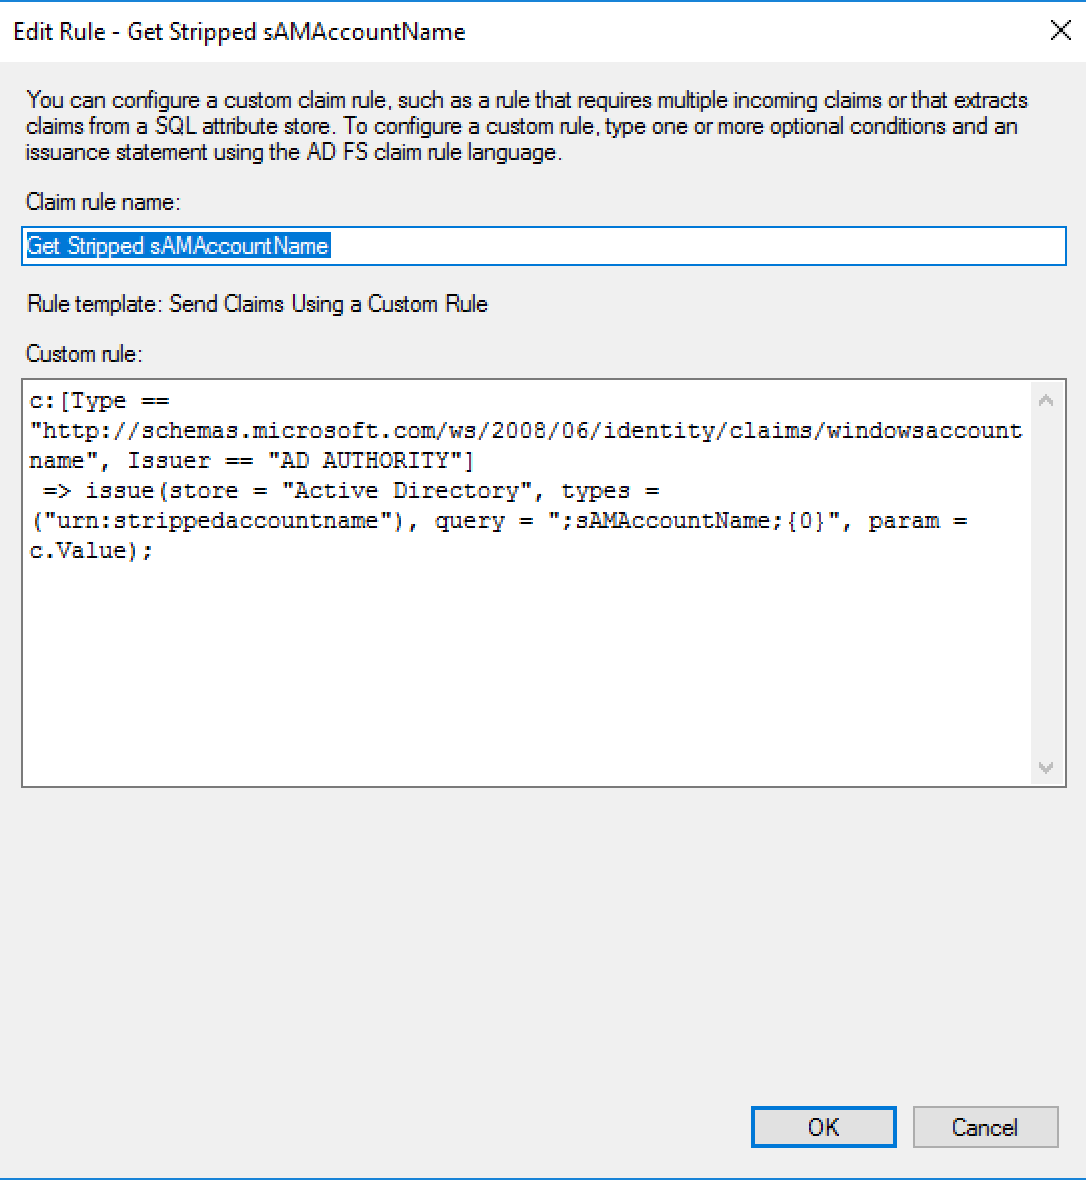
- From the
Add Transform Claim Rule Wizard, selectSend Claims Using a Custom Rule, and clickNext. - In the
Claim rule namefield, type "Get Stripped sAMAccountName". - In the
Claim rulefield enter the following string:c:[Type == "http://schemas.microsoft.com/ws/2008/06/identity/claims/windowsaccountname", Issuer == "AD AUTHORITY"] => issue(store = "Active Directory", types = ("urn:strippedaccountname"), query = ";sAMAccountName;{0}", param = c.Value); - Click
Finishto create the rule.
- From the
-
Add the "Transform Stripped sAMAccountName to Name ID" attribute definition (ensure that this entry is ordered after the 'Get Stripped sAMAccountName" attribute definition):
- From the
Add Transform Claim Rule Wizard, selectSend Claims Using a Custom Rule, and clickNext. - In the
Claim rule namefield, typeTransform Stripped sAMAccountName to Name ID. - In the
Claim rulefield enter the following string:c:[Type == "urn:strippedaccountname"] => issue(Type = "http://schemas.xmlsoap.org/ws/2005/05/identity/claims/nameidentifier", Issuer = c.Issuer, OriginalIssuer = c.OriginalIssuer, Value = c.Value, ValueType = c.ValueType, Properties["http://schemas.xmlsoap.org/ws/2005/05/identity/claimproperties/format"] = "urn:oasis:names:tc:SAML:1.1:nameid-format:unspecified"); - Click
Finishto create the rule.
- From the
-
Click
OKto close theEdit Claim Issuance...dialog.
Dialog Box Examples
A populated Add Transform Claim Rule Wizard dialog that strips the domain from the username.
A populated Add Transform Claim Rule Wizard dialog that sends the stripped username to the application.
